These setups run from a heavy lumber bench bolted to the wall to a full modular cabinet system on wheels, and the one that fits you depends on whether you need to roll your workspace to the project or keep the project fixed at the bench.
[link-whisper-related-posts]1. Heavy Lumber Bench
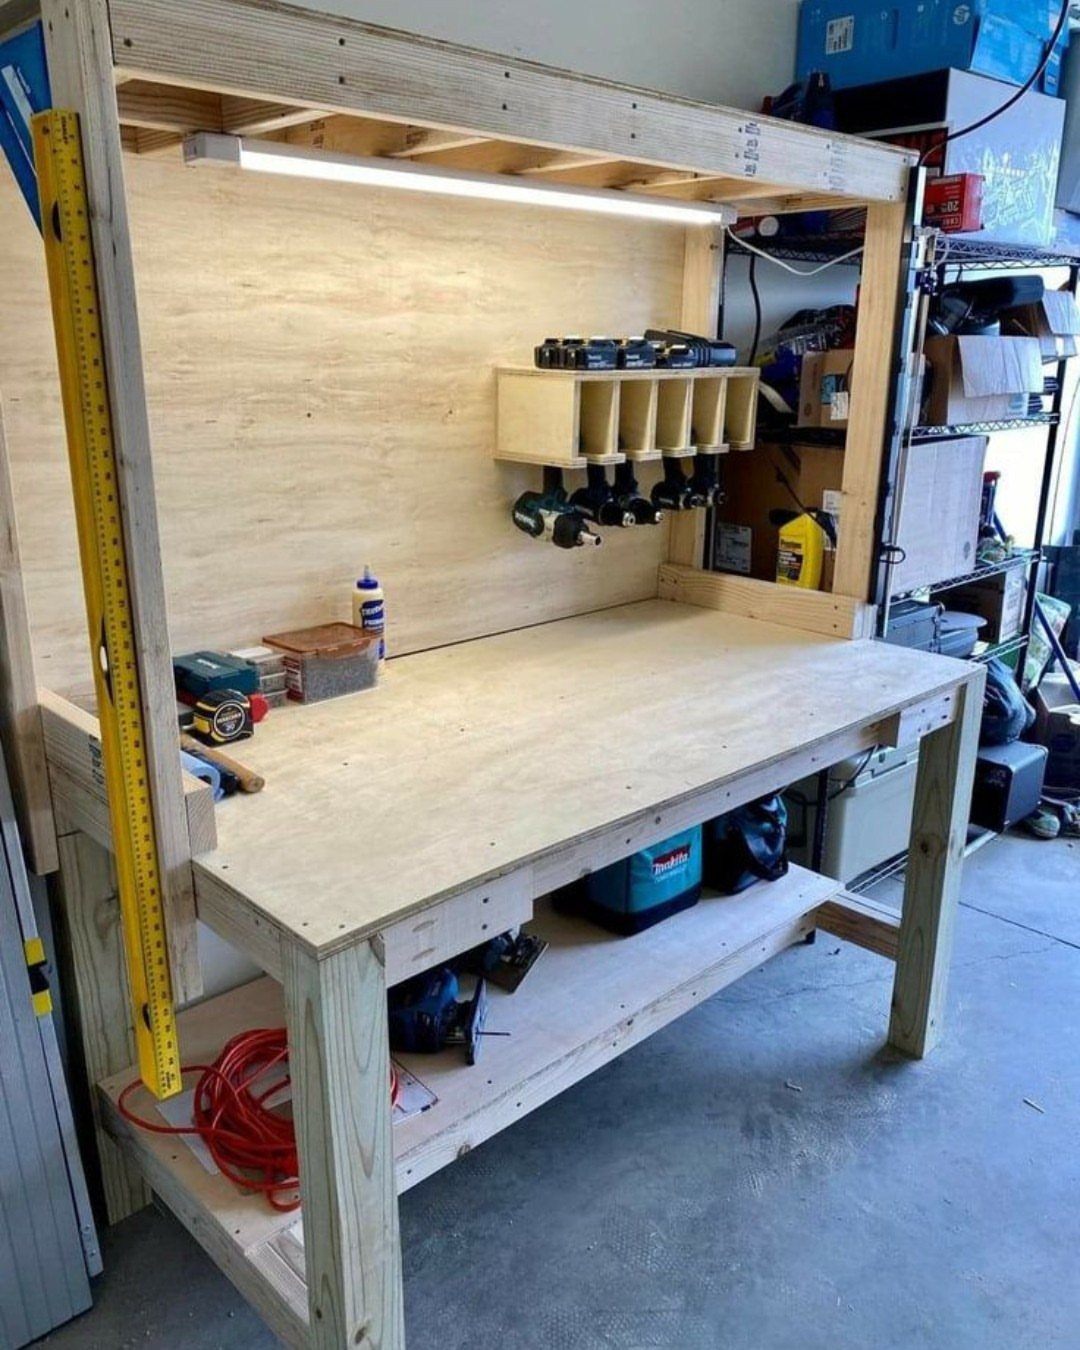
A heavy lumber bench gives you a work surface you can beat on for years without worrying about dents.
A plywood bench top takes abuse without complaint, and a few inches of overhang on each side turn the whole edge into a clamping surface for a vise or a board in a hurry.
2 foldable sawhorses with a sheet of plywood work too, and you can carry the whole setup outside for a project that needs fresh air.
An upper shelf and a spot for drills keep the surface clear so you have room to work.
That matters more than it looks like it would; every tool left on the bench is a tool in your way next time.

Eco-Friendly: The garage workbench tops are made of natural pine wood, with a clear texture and not prone to deformation.

Interior and Exterior Steel Pegboard Surfaces to Organize and Store Tools
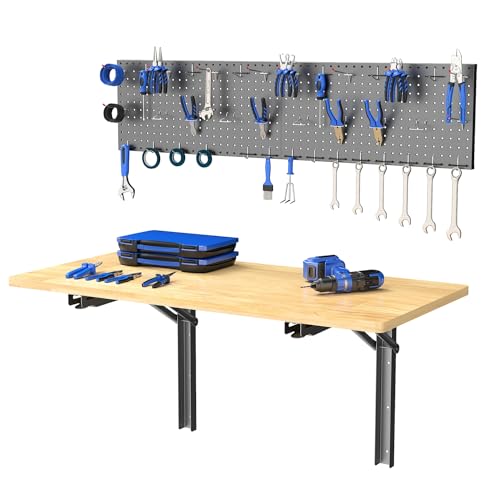
Complete Kit Included: The package contains everything needed for assembly, including the solid workbench top, folding brackets, pegboard kit, and mounting hardware—no extra purchases required
2. Lighting
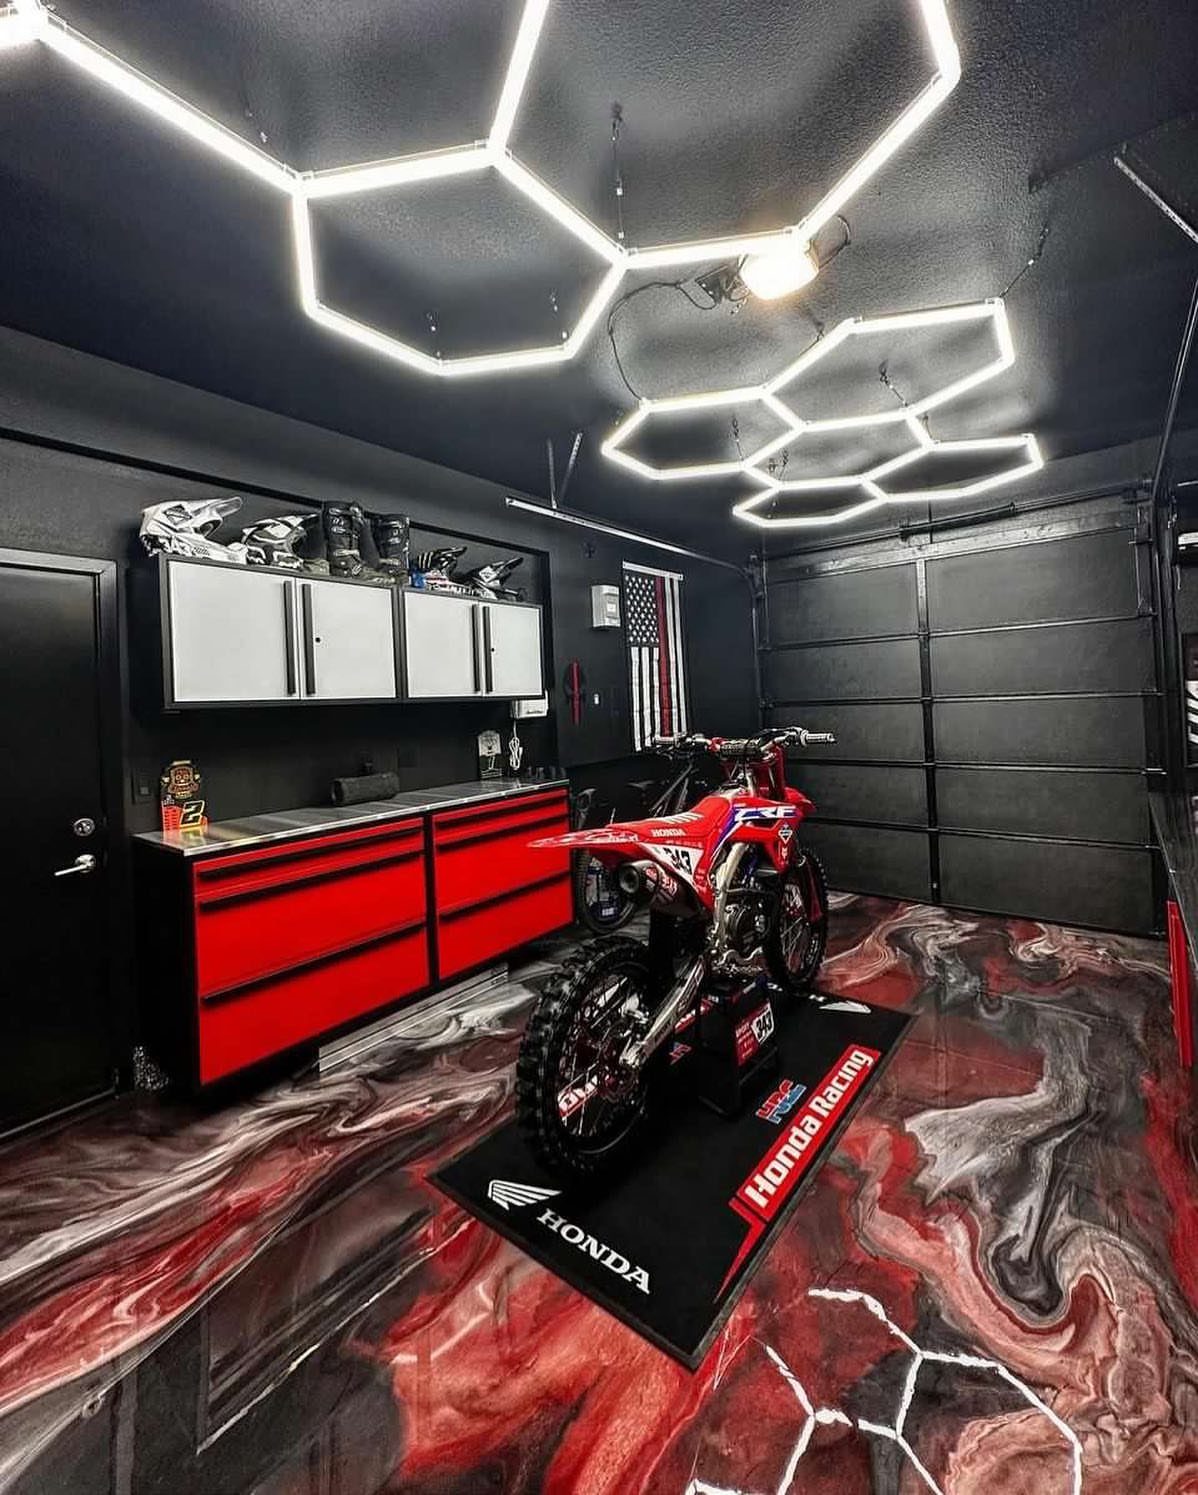
Overhead lighting alone leaves your work surface in shadow the moment you lean over it.
The hex fixtures in this garage throw plenty of lumens, but the real move is adding task lighting right at the bench level where your body blocks the ceiling lights.
I learned this the hard way trying to read pencil marks on a cut line under nothing but a single bulb.
An LED strip under the shelf above your bench, or a swing-arm lamp clamped to the back edge, fixes the problem for cheap.
Dark walls and cabinets absorb light, so bright fixtures in a black or red garage work harder than they would in a white room; plan for more lumens than you think. Plan for that if you’re painting.

【Super Bright & Energy-Efficient】: 22W 3300 LM – brighter than 40W fluorescents while reducing energy use by up to 70% on electricity bills

Daylight White: The upgraded Barrina 2FT LED shop light has an incredible 20 watts and 3000 lumens high output, providing professional lighting for you.Please note that we have a brand new upgrade. If you need to connect new and old products, make sure to use the new male-female connector cables

[ETL Certificates Safety Cabinet Lights]-ASOKO Under Cabinet Kitchen Lights have passed the stringent ETL safety certification, and specially reinforced cords and plugs ensure stability and safety even during frequent plugging and unplugging in daily use, suitable for kitchen/table /workbench
3. Storage Solutions
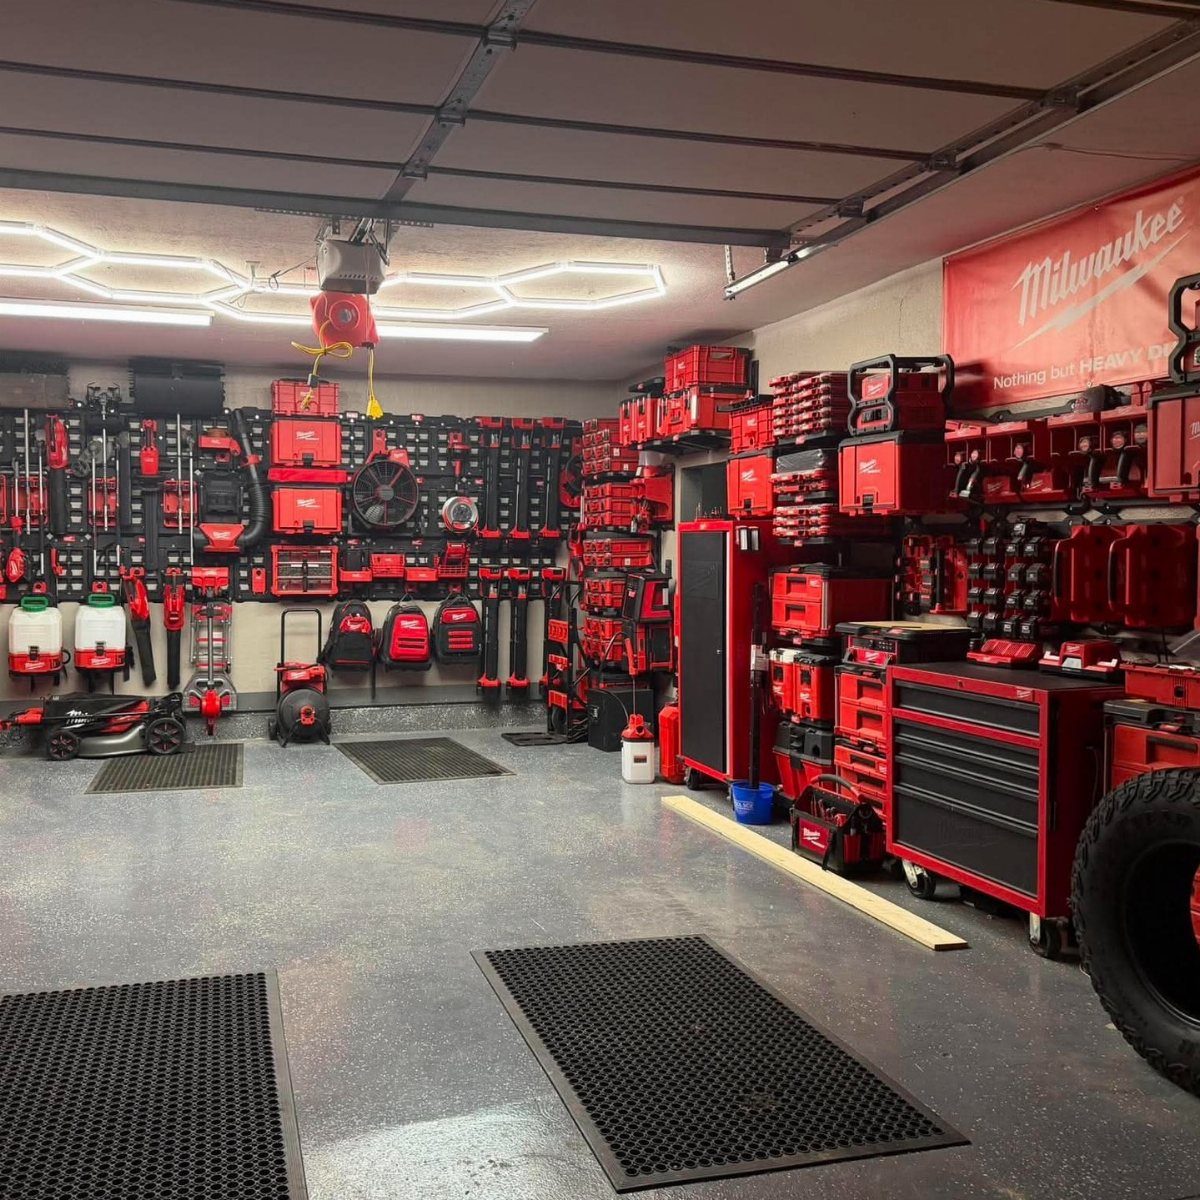
Ceiling-mounted racks and wall systems get your floor back.
I keep one bucket for plumbing repairs, another for electrical, and I can carry either to the problem without digging through drawers.
The sleeve turns any hardware-store bucket into a mobile toolbox for less than the price of a takeout lunch.
Overhead shelves work best for things you lift rarely; ceiling-mounted racks for lumber or seasonal gear keep the walls free for pegboard or slatwall where your hands actually reach.

900 lbs Tested, 450 lbs Rated Weight Capacity: Our overhead garage storage rack undergoes rigorous double load testing (900 lbs) to ensure unmatched safety and durability, supporting up to 450 lbs for your tools and equipment.

USA BASED & FAMILY OWNED - Our patent pending handy connectable garage ceiling storage racks design was invented by father and son tradesmen looking for a handy way to unlock more storage. The rails allow you to connect as many together as you can fit in your garage, shed, or workshop space.

Versatile: Ceiling mounted garage storage hooks are perfect for garage organization, suitable for ladders, wood, fishing rods, tools, bicycles, garden hoses and other large items, and are efficient and convenient storage management solutions.
4. Basic Set of Hand Tools
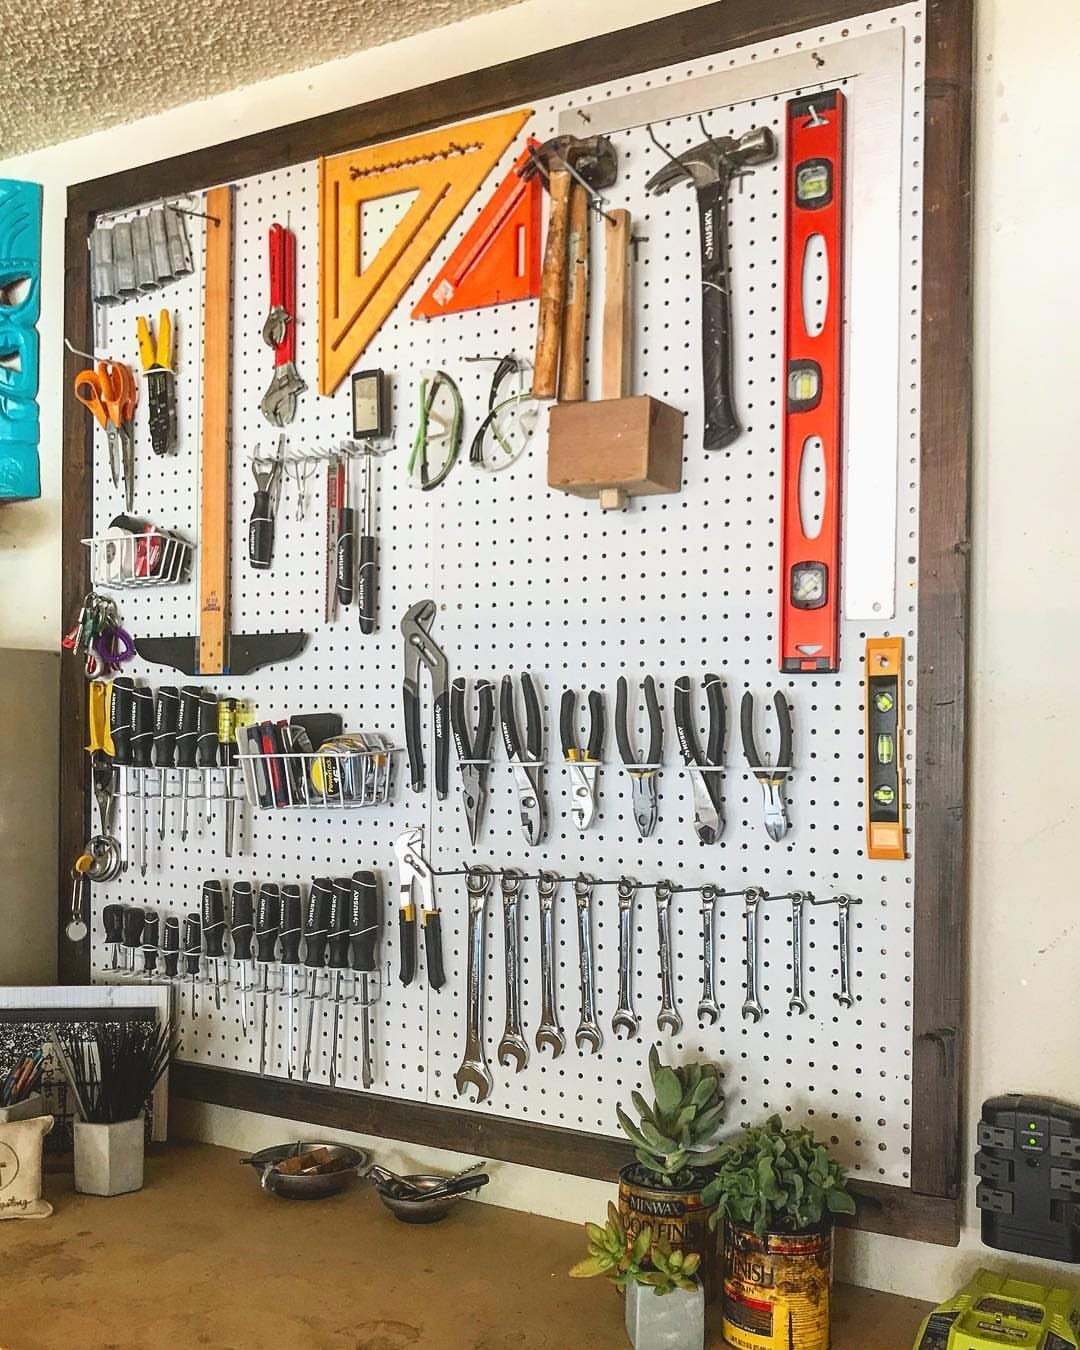
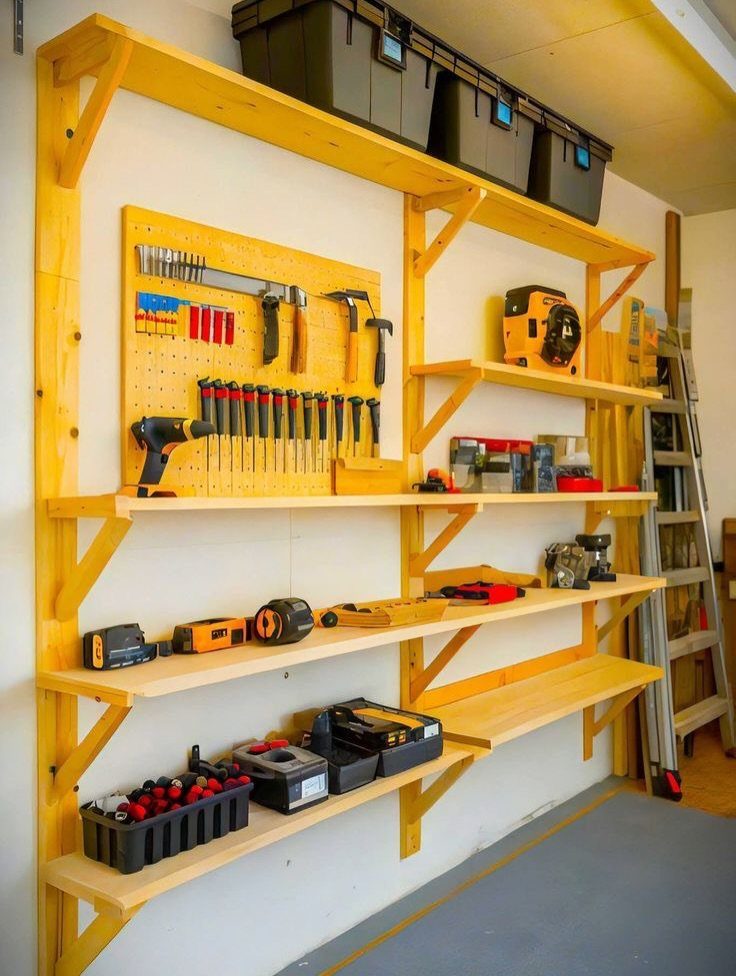
A pegboard of hand tools is the wall I look at first in any garage.
A drill-driver, a hammer, an adjustable wrench, a set of screwdrivers, and a level cover most of what a weekend project asks for.
Add a tape measure, a utility knife, and a square as soon as you have them. The succulents on that bench are optional; the layout of the tools is not.
I hang mine by the task they do, not by type.
The stuff for electrical lives together, the stuff for plumbing lives together. It saves the step of remembering which drawer or which section of wall.

Durable and Lightweight construction makes this modular tool storage system perfect for home use

COMPLETE MOBILE & WALL STORAGE SOLUTION.Transform your cluttered garage with this comprehensive tool storage set. The system combines mobile units with heavy-duty casters and wall-mounted components for vertical storage. This all-in-one configuration gives you the flexibility to store everything from power tools and hand tools to automotive supplies and seasonal equipment — all in one organized system.

【Versatile 2-in-1 Design】 This professional tool chest combo integrates a portable top toolbox with a large-capacity rolling bottom tool cabinet. Use them together as a mobile workstation or detach them for independent use, offering maximum flexibility for your garage, workshop, or repair shop.
5. Modular Tool Cabinet Workbench System
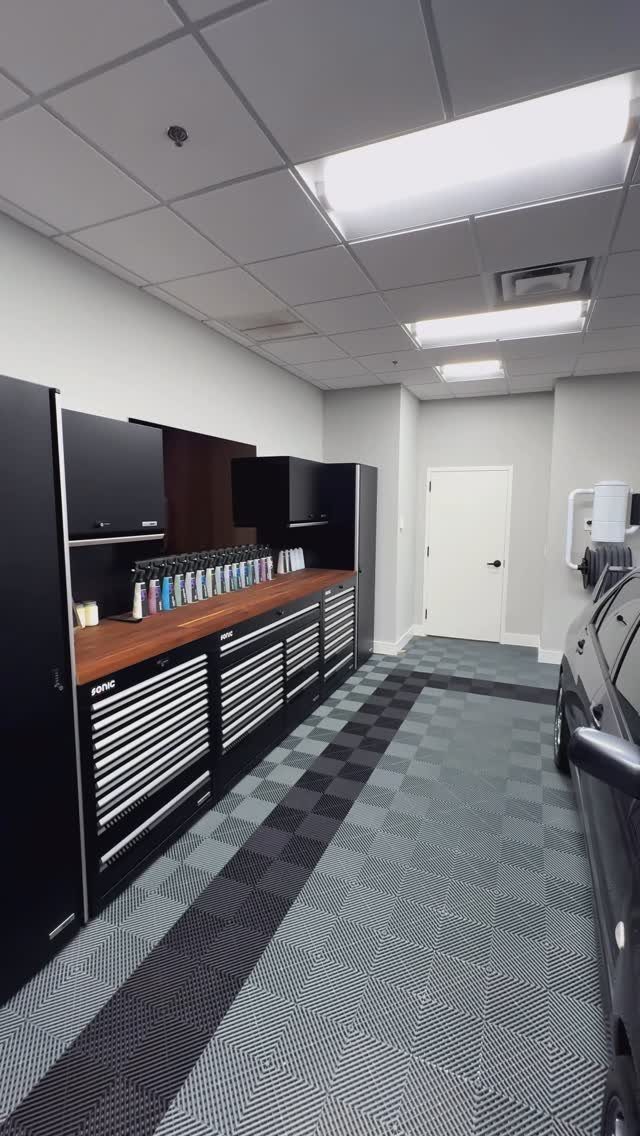
A modular layout changes how a small garage works.
One cabinet holds automotive hand tools, another holds woodworking gear, a third holds paint and body supplies.
When I need to work on the car, the mechanic’s cabinet sits ready in the center bay. When I’m cutting lumber, that cabinet stays put and the woodworking setup takes the open floor space.
The wood countertop bridges the cabinets into one continuous surface. A 2-car garage becomes three specialized workshops that never have to coexist in the same footprint at the same time.
Regardless of its size, a useful garage workshop has four essential elements: work surface, light, ventilation and storage.
— Hunker

All Metal Material: Our garden tool organizer, both backboard and hooks are made of iron, which makes it more durable and solid.And its load-bearing capacity far exceeds other usual ABS material tool hooks. It is deal for various tools like shovel, rakes, bikes, broom, mop, trust that what you get is what you see,any dissatisfaction please contact our customer service team

Sturdy Steel Structure & Large Capacity: Built with heavy-duty steel and reinforced crossbars, this garage organizer is designed to withstand corrosion and daily wear. Its rigid frame delivers stable load-bearing performance up to 400 LBS for long-term use, and fits most common wall surfaces including concrete, brick, pegboard, and wooden walls

METAL NAILBOARD: Our peg board panels are made of high quality steel with a powder coated finish that is strong, scratch resistant and easy to clean. Each small pegboard has a weight capacity of up to 50 lbs. This is a favorite product for tool organizers, DIY enthusiasts, store owners and office workers.
6. Custom Wooden Power Tool Organizer
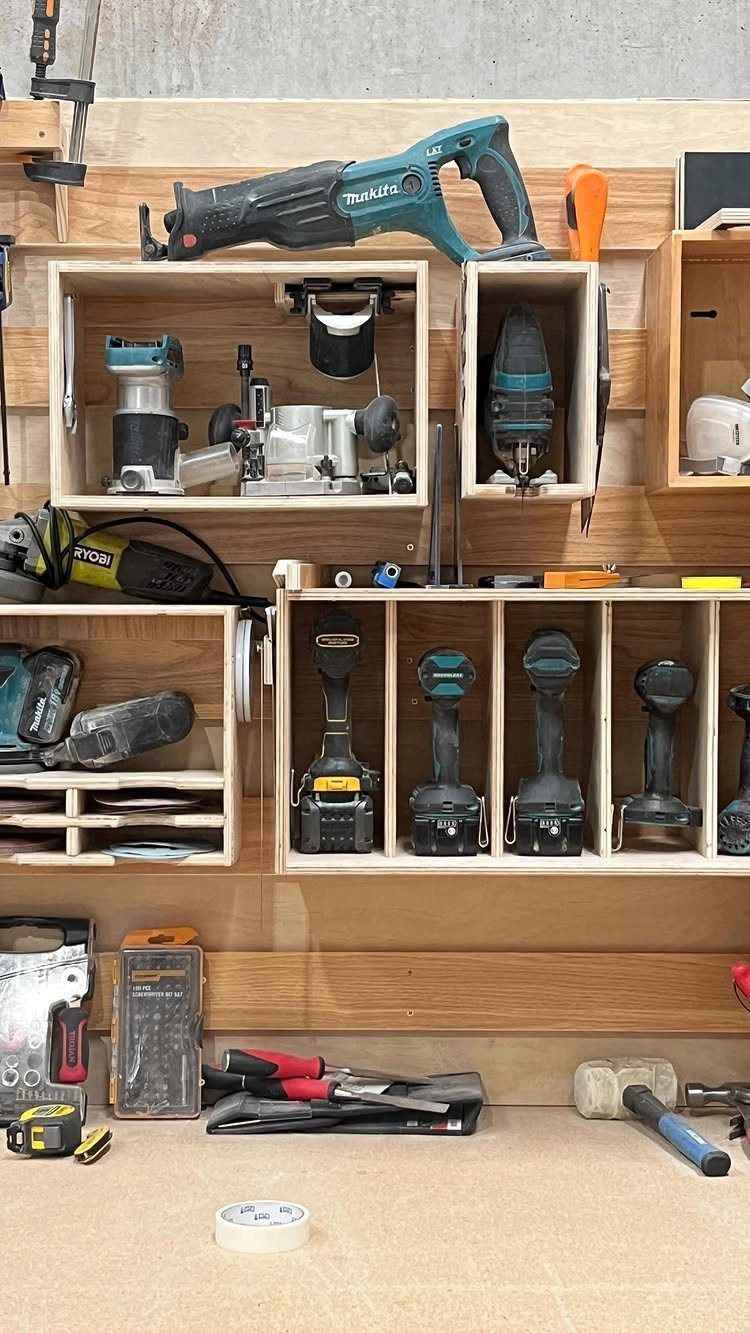
French cleats let you rearrange tool storage without drilling new holes every time you buy a tool.
Plywood boxes sized to each tool, hung on a wall-mounted cleat, keep drills, a router, and a jigsaw off the bench and in order.
My first French cleat system came from plywood ripped at an angle so the wall strip and the box strip lock together like a hanging bracket.
The wall gets one strip with the bevel facing up; each box or shelf gets a matching strip with the bevel facing down. Gravity and the angle do the rest.
The boxes are modular, so you can swap a drill box for a sander box when your collection changes.
Label the ends. Label the box or the cleat; memory fades faster than Sharpie.

Complete Kit Included: The package contains everything needed for assembly, including the solid workbench top, folding brackets, pegboard kit, and mounting hardware—no extra purchases required

Versatile Extra Work Space: Collapsible workbench can transform any space into a workspace. It can be used as a dining or desk space, crafts table, or laundry folding area. Adds workspace while keeping room for storage

Complete Kit Included: The package contains everything needed for assembly, including the solid workbench top, folding brackets, and mounting hardware—no extra purchases required
7. Rolling Tool Chest Workbench
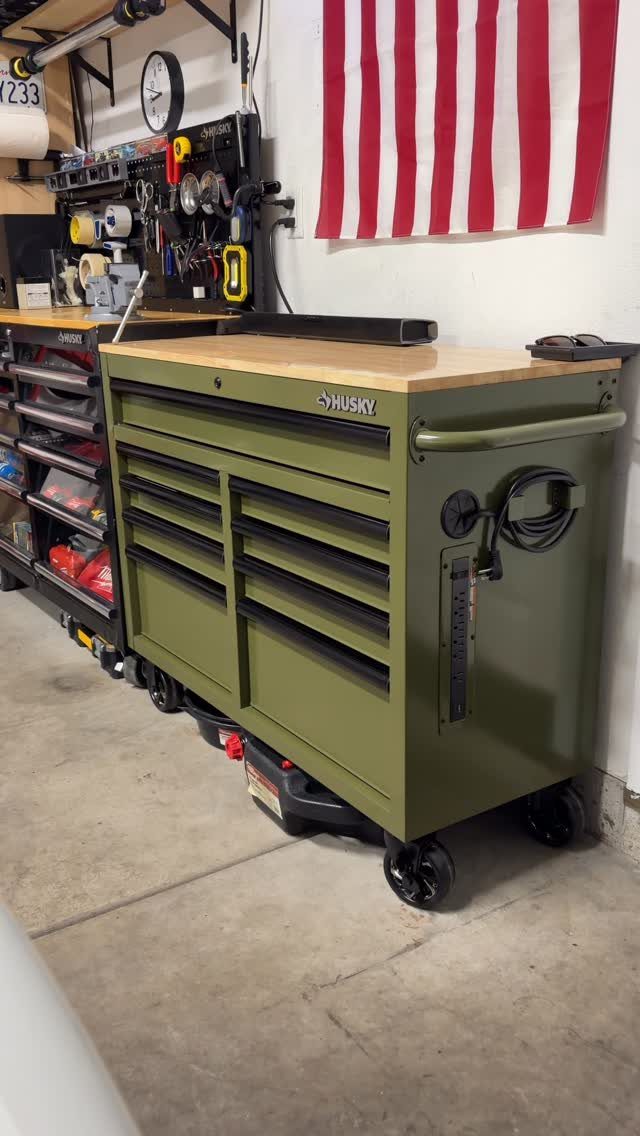
A rolling tool chest with a wood top gives you storage and a work surface in one footprint, and casters let you roll it to where the project is.
A rolling tool chest in olive green with a side handle means one person can reposition it, even loaded.
That matters in a 20×26-foot two-car garage where a drill press, a grinder, and a table saw might all be on wheels already, competing for the same floor space.
I would check the top height before buying. If you plan to sit at it, measure your stool height first; most chests run tall for standing work.
Some owners build a rolling chassis to raise a tanker desk to that exact height and slide it under fixed storage when the job is done.
The same logic fits a chest: roll it out to straddle the work, roll it back when you need the bay for the car.
A mini fridge underneath is optional. The clearance to roll under something fixed is not.

ENERGY EFFICIENT: Provides bright light while consuming only 40W. Benefit from reduced electricity bills and lower carbon footprint

【Wide LED Work Area Lighting】The large LED panel provides broad, even illumination across your workbench or desk, making it ideal for detailed tasks such as crafts, repairs, model building, puzzles, drawing, and manicure work.

【Super Bright Clamp Light】60 high brightness led beads, led sewing machine light and clamp work light, the 20W led work light provide 2000 lumen lighting source and 6500k white light, which can be used to light all the dark corners of the work bench, great little work light for small areas. This flexible clip on light it will No flickering or dimming occurs during operation, with a lifespan of approximately 45,000 hours.
8. Slatwall Tool Organization System
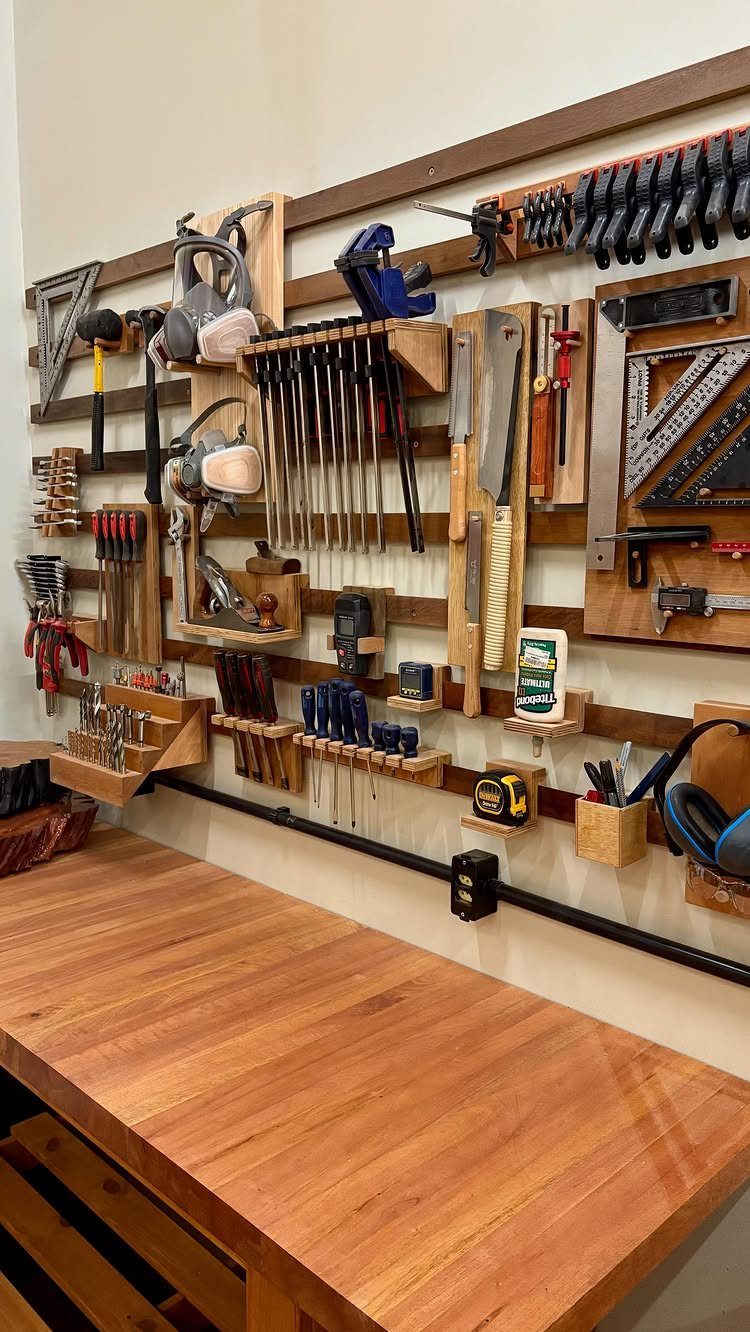
Slatwall above the bench keeps tools visible and within arm’s reach without the pegboard holes that strip out after the third rearrangement.
Wood slatwall runs horizontal, with custom holders for clamps, saws, and a drill. Titebond bottles sit on the same plane, which tells you the slat spacing and the bracket depth hold more than hand tools.
Check whether your slatwall is aluminum or PVC before you buy hooks; the two systems do not interchange, and a holder that slides smoothly in one binds in the other.
I would decide the bench depth first, then mount the slatwall high enough that the longest tool clears your head with the bench between you.
The clean bench surface below is the point: every tool lives on the wall, so the work area stays clear for the actual work.

Maximize Garage Space Efficiently: Use this ceiling storage for garage to free up valuable floor space. Ideal for bins, luggage, and bulky items with over 30 cubic feet of storage capacity

1200 lbs Tested, 750 lbs Rated: Our overhead garage storage rack undergoes rigorous 1.6 times load testing (1200 lbs) to ensure unmatched safety and durability, supporting up to 750 lbs for your tools and equipment.

EXTREMELY STURDILY MATERIAL: The garage hooks is made of premium heavy-duty solid steel and the plate are reinforced with three layers, providing superior load capacity, the utility hooks are great for ladders, sports equipment, lawn trimmers, gardening equipment and other bulky items!
Tool Accessibility
Keep the tools you reach for ten times a project on the wall at bench height, not in a drawer two steps away.
The slatwall and pegboard entries both assume this, but neither says why: every step to fetch a tool is a step back, and the break in rhythm costs more than the seconds it takes.
I hang my tape measure on a nail driven into the front edge of the bench itself; it never goes back to the wall because it never stays there long enough to matter.
The same logic fits the drill, the square, the pencil.
The French cleat boxes and the rolling chest both work because they bring the tool to where the work is, not because the storage is clever. Clever storage that adds motion is worse than a hook in the right spot.

【37% Wider & 27% Deeper Than Normal】: Oversized rolling metal storage cabinet have spacious space and can hold 30% more than others. It have 4 adjustable shelves,2 pegboards and 4 hooks. You can storage kinds of tools,file,food,appliance etc according to the size of the things. It can be used in garage,workshop,basement,office,classroom,utility room etc.

【Rolling Garage Storage Cabinet】Keep your garage, workshop, basement or utility room organized with this rolling metal storage cabinet. Measuring 26" W × 14" D × 31.88" H (including casters), it offers ample storage while fitting comfortably into compact spaces. Four smooth-rolling 2.36-inch swivel casters and an ergonomic push handle allow effortless mobility, keeping tools and supplies organized and within easy reach.

COMPLETE MOBILE & WALL STORAGE SOLUTION.Transform your cluttered garage with this comprehensive tool storage set. The system combines mobile units with heavy-duty casters and wall-mounted components for vertical storage. This all-in-one configuration gives you the flexibility to store everything from power tools and hand tools to automotive supplies and seasonal equipment — all in one organized system.
Safety Measures
Safety glasses, ear protection, and a dust mask are the baseline, not the finish.
The overhead racks and ceiling storage matter here too: a ladder pulled down for a single board is a ladder you climb tired, and tired climbing is where most garage injuries happen.
I keep a step stool fixed to the wall at the rack end, not leaning against it where it walks off.
The rolling chest and modular cabinets add their own hazard; a brake that does not lock is a cart that rolls when you lean. Test the casters every few months, the same way you check a blade guard.
LED strips under shelves help you see the tool, but they also help you see the trigger lock and the cord path. Light is safety gear the same as glasses are.

100% Heavy Duty Premium Metal, Thickened,Reinforced and Anti-Slip Design.

Tool Storage Rack: The screwdriver holder wall mount is equipped with holes of different shapes and sizes, which can store various types of tools such as screwdrivers, pliers, wrenches, hammers. Hanging the tools on the rack makes them clearly visible, allowing you to quickly access the tools you need at a glance

4-Outlet Power Strip:This garage shelf wall mount features an integrated 4-outlet power strip with a 6.5-foot cord for easy charging. Charge your tools directly on the shelf without the hassle of searching for outlets. By combining storage and functionality, this tool rack saves space while ensuring your power tools are always ready for use.
Workspace Cleanliness
A clear bench is not the same as a clean one. Sawdust under a plywood top is grip until it is packed enough to slide on; vacuum the seams when the project shifts from cutting to assembly.
The bucket system helps here because it leaves with the job, not because the buckets are tidy.
What stays in the garage, stays in the way. Dark walls hide dust until it is thick enough to matter for light reflection and for air quality both; a white wall shows the film that tells you it is time.
The rolling chest with a wood top needs the same wipe-down as any bench; oil and grit together make a surface treacherous for layout work.
I sweep before I put tools back, not after, because putting tools back is the moment I know where each one lives and whether it is clean enough to store.
Project Planning
A project plan is a materials list and a cut list written before the first board comes off the rack.
The modular cabinet system only works if you know which cabinet you need before you roll it; the French cleat boxes only earn their keep if you have already decided which tools the job calls for.
I write the list on the back of a receipt while I am still in the house, where the coffee is and the tape measure is not.
The lumber bench entry mentions clamping surfaces; check your project against that spec before you start, not when you are holding 2 boards together and reaching for a clamp that does not fit the overhang.
The slatwall and pegboard both reward the planner because the right hook is already in place; the rearranger pays in time and in stripped holes.
Frequently Asked Questions
How to setup a garage workshop?
Start with a sturdy work surface that lets you clamp to its edges, then add task lighting at bench level where overhead fixtures leave shadows.
Storage comes after those two; ceiling racks get your floor back, and wall systems keep hand tools within arm’s reach.
A workshop needs airflow as much as it needs layout and light, so plan for a window, a fan, or at least a door you can prop open when the sawdust flies.
How to organize yard tools in garage?
Ceiling-mounted racks work best for long-handled yard tools you lift rarely, keeping wall space free for pegboard or slatwall where your hands actually reach.
A bucket that holds shears, gloves, and twine in one grab is faster than walking back and forth to a wall rack every ten minutes.